
Microsoft Word is essential for anyone who does any sort of work with documents. Word’s been around for so long, it’s impossible to imagine doing office, school, or any other type of digital work without it.
While most users use only the most basic features that Microsoft Word offers, they don’t realize the capabilities they’re missing out on. Aside from being able to open, view, and edit documents, Word gives you an ability to design greeting cards, create barcodes, and make your own booklets among many other things.

So, let’s make a booklet in Microsoft Word, both manually and using one of the built-in templates.
Note: The screenshots are from Microsoft Word for macOS.
How to Make a Booklet Using a Word Template
Using Microsoft Word templates can save you time and effort when working on your documents. Whether you’re making a booklet for your school project, or for a popular event in town, you can find the right template in Word’s free templates collection so that you don’t have to start from scratch.
To make a booklet using Microsoft Word’s templates, follow the steps below.
- Open a new Microsoft Word document.
- From Word’s menu, select File > New from Template.

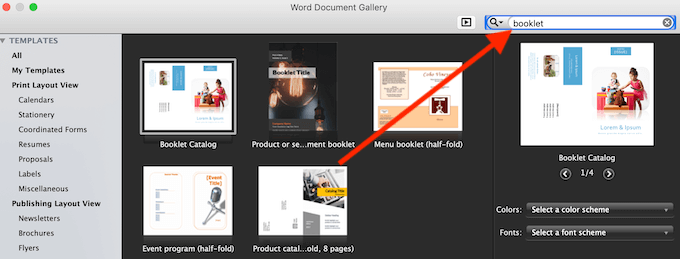
- In the Word Document Gallery window you’ll see a standard selection of the most common templates.
- Find the search bar in the top-right corner of the window, and type booklet to search the templates. You can also use different keywords, like event or school project to look through other themed templates that might suit your needs better.
- When you find the template you want to use, select Create (or Choose if you’re using an older version of Word).
- Word will then download your template and you can start working on your booklet.
- After you finish, select File > Save As to save your booklet.

You can customize the selected template right inside the Word document before you start working on your booklet to fit your needs better.
How to Make a Booklet in Word Manually
If you don’t find the right template, you can create a booklet in Word from scratch using the special booklet page settings – the Book Fold layout. This layout allows you to easily create and print a booklet ready for folding or binding.
To make a booklet in Word manually, follow the steps below.
- Open a new Microsoft Word document.
- Select the page Layout tab.
- Select the little arrow icon at the bottom-right corner of the tab to open the Page Setup window.

- In the Page Setup window, follow the path Margins > Multiple pages > Book fold.

- Change the page Orientation to Landscape if it didn’t change automatically.
- Under Margins, you can also set up the right value of Gutter – the amount of space that you want to leave for binding.
- Open the Paper tab and select Paper size if you want to change the size of your booklet. Note that the physical size of your booklet is half of the paper size that you set up.
- Under the Layout tab, you can edit your booklet’s appearance further. For example, you can add borders to every page by following the path Page Setup > Layout > Borders.
- When you’re happy with all of the measurements, select Ok. If you decided to do the formatting after adding the content to your booklet, you should see the text formatted automatically.

If when you finish adding content to your booklet, you see that the document is too long, you can split it into multiple booklets and then bind them together after printing. You can select how many pages to print per booklet under Margins > Pages > Sheets per booklet.
How to Print a Booklet in Word
If you used one of Word’s free templates for creating a booklet, printing it out is extremely easy. Booklet templates are designed to make sure the page orientation is correct when you print them on both sides of the paper. All you have to do to print your booklet is to select File > Print.

If you choose to make your booklet manually from scratch, you need to check the print settings in advance to make sure you print on both sides of the paper and flip it correctly to keep the right page orientation.
After you select File > Print, check if your printer supports automatic printing on both sides. In that case, under Settings select Print on Both Sides. Then select Flip pages on short edge to make sure you don’t print the second side of each page upside down.

If your printer doesn’t support automatic printing on both sides, select Manually Print on Both Sides and put the pages back into the printer manually when needed. In this case you’ll have to flip the sheets on the short edge yourself to keep the right page orientation.
Make Your Own Booklets in Word from Scratch
When you know your way around Microsoft Word, you can truly get creative with it and use the software to do more than just open and edit text documents. Aside from making your own greeting cards and booklets, you can also use Word to practice drawing and improving your artistic skills.
Have you ever used Word for creating booklets before? Which method did you use? Share your Microsoft Word knowledge with us in the comments below.
source https://www.online-tech-tips.com/ms-office-tips/how-to-make-a-booklet-in-word/