Did you know that people watched more than 1099 billion minutes of Twitch streams throughout 2020? That’s great news for anyone that wants to be a streamer, because the demand is there. All that’s left for you to do to get started is decide on the type of streaming software you want to use.
There are two main options: XSplit and Open Broadcaster Software, or OBS. Both offer streamers a lot of customization and functionality, but they both have so much to offer that it can be tough to determine which one is the best fit for you.

Pricing
If you’re a budding streamer, then chances are you don’t want to sink a lot of money into this endeavor until you see some return on your time. From that standpoint, OBS is the better option. OBS is a free and open-source program that’s fully-featured right out of the gate.
On the other hand, XSplit is powerful, but much of its functionality is locked behind the premium version of the program that starts at $6.24 per month. It isn’t shy about this fact, either: As soon as you install XSplit, it prompts you to upgrade. XSplit also places a watermark on your streams unless you pay.

There are multiple pricing options: a 3-month license for $18, a 12-month license for $44.96, a 36-month license for $112.46, and a lifetime license for $149.25. The best value is the lifetime license, despite its higher price. It’s a one-time fee.
If you’re on the fence, try both programs using the free version. If you really want to try out XSplit and all of its features, opt for the 3-month version until you’re sure you want to dedicate to OBS or XSplit.
Performance
Streaming software should demand minimal resources from the machine running it. A computer’s resources should be dedicated to the game, not the streaming.
On an idle screen, OBS used 0.1% of CPU resources. Once we began streaming, the demand jumped to 1.3% as the program launched, but quickly settled at 0.7% and remained there throughout the stream. We tested OBS using MTG: Arena, a non-demanding game.

On the other hand, Xsplit used 2% of CPU resources while idling. When streaming, XSplit leapt to 12% during the launch of the stream and settled back between 3% and 4%. We tested XSplit using the same game as OBS.
One thing to note is that XSplit performed poorly during setup and navigation. Creating new scenes took far too long and required several force quits when XSplit became unresponsive. OBS did not have this problem.
Interface and Setup
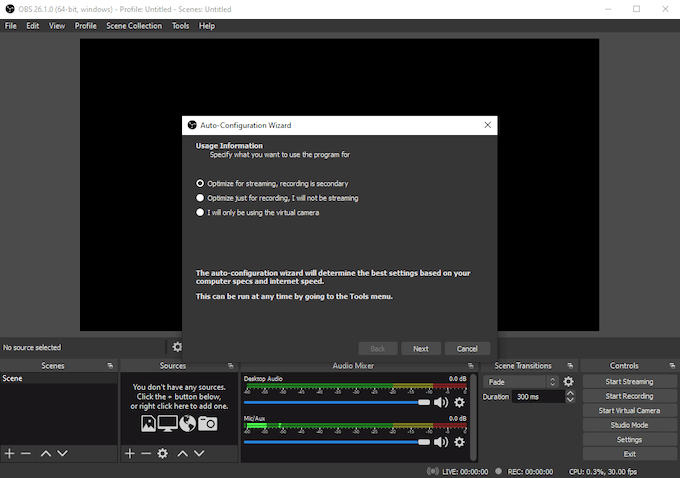
When you set up OBS, it automatically optimizes performance based on how you plan to use it. It presents you with several options: optimize for streaming, optimize for recording, or optimize for use with just the virtual camera. You can change these settings at any time from within the options menu to help you better tweak performance.
Once set up, OBS has a rather complicated interface. There are multiple menu options like Scene, Sources, Scene Transitions, Audio Mixer, and Controls. These give you direct access to your most-used commands and are aimed at serious streamers that want to fine-tune control of their streams on the fly.
XSplit has a more simplified interface. It displays the current scene and gives you the ability to swap between different scenes with just a few clicks. The more advanced controls, like the Audio Mixer and others, are accessible through the Extensions and Tools menus.

When you first install XSplit, it asks you to login. You can create a dedicated XSplit account, or you can log in through Twitch, Facebook, or YouTube. When you log in through any source besides XSplit, it automatically imports some of your account information and makes it easier to set up a stream output to one of these platforms.
OBS allows you to import filters to use over your stream, swap between your broadcast source, and even change up scene transitions with just a few clicks. You can also enable Studio Mode, a feature that allows you to preview how the stream will look before you implement it.
XSplit allows you to change scene transitions on the fly, but it requires several more clicks to access the same functions that OBS has right on the dashboard.
Plug-Ins
Both OBS and XSplit can expand their functionality through first- and third-party plugins. These plugins do everything from integrating other services to making it easier to interact with fans.
OBS plugins can be found at the OBS Project website, where there are hundreds of different plugins to browse. Categories include Themes, Tools, Scripts, Guides, and more. OBS has far more plugins available than XSplit does due to its nature as an open-source program.

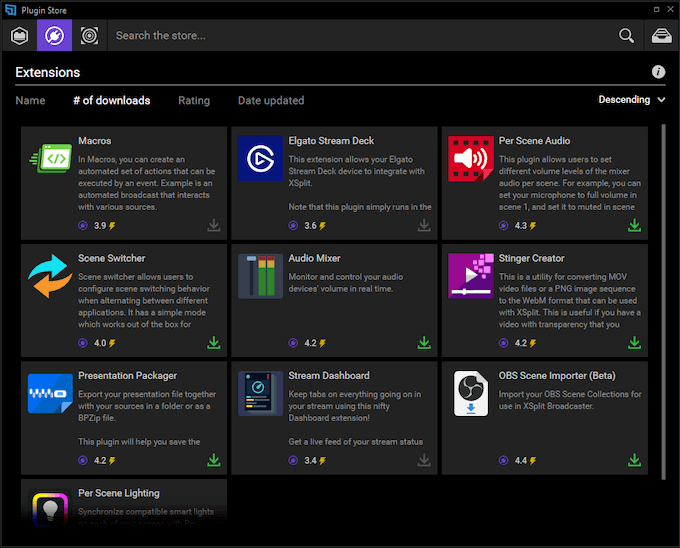
XSplit plugins are accessed through the XSplit software itself. Go to Tools > Plugin Store to open the window where you can search through the various options. While it doesn’t have quite as many plugins as OBS, there are still dozens, if not a hundred or more plugins available.
These are divided into three main categories: Sources, Extensions, and Outputs. Sources gives access to things like live chat viewers, while Extensions includes integrations for third-party resources like Elgato. Output provides plugins for easily broadcasting to YouTube Live and other platforms.
XSplit vs OBS: Which is The Best For Streaming?
Both programs are useful, but in the end, OBS is the better option overall. While it’s more complex, its open-source nature means the potential for expansion is limited only by the willingness of the community. Since it’s one of the most popular streaming services on the planet, there is no lack of willingness.
XSplit isn’t a bad option, but if you have to pick one or the other, OBS is free, places less stress on your system, and has a huge community to help troubleshoot problems that arise. Give it a shot and start your journey towards becoming the next streaming Ninja.
source https://www.online-tech-tips.com/gaming/xsplit-vs-obs-which-is-the-best-for-streaming/
