
If you work from home or attend classes online, then you no doubt have phrases you type on a regular basis. Or maybe you have a specific file you need to open often, but not leave open. Whatever the reason, Windows Autohotkey can provide you a fast way to perform a series of tasks.
What is Windows Autohotkey?
Windows Autohotkey is a free and open-source scripting language that allows users to create scripts for Windows. While it uses its own programming language, you don’t have to be skilled at coding to make use of the tool. It’s intuitive and easy to pick up, especially given the wealth of resources available online.

This tutorial will walk you through the basic steps involved with using Windows Autohotkey. To put into perspective how useful this tool can be, “Windows Autohotkey” is 18 characters long including the space. It was typed throughout this article using only three keystrokes. Interested? Read on to find out how.
One thing to keep in mind is that this tutorial only covers the basics. Windows Autohotkey is a powerful tool with far-reaching applications — too many to cover in a single tutorial. This tutorial will help you get your feet wet so you can start experimenting.
Downloading and Building Your First Script
Windows Autohotkey is not built into the Windows OS, so you will need to download it from the website. Once you download it, follow the on-screen instructions. If asked to choose between ANSI and UNICODE, select UNICODE — it has wider support for non-English characters. Once you’ve installed the program, go to your Desktop.
Right-click any empty spot on the screen and select New > Autohotkey Script. The script will appear as a file on your desktop. Give it a name that makes it easy to identify and hit Enter. After this, right-click the file and choose Edit script.

This will open an editing screen, most likely in Notepad. For the example, we will make a script that automatically types:
Sincerely yours, George Jetson
All you have to do is hit the hotkey. First, type:
^j::
The ^ symbol means CTRL, so you will hit CTRL+J to activate this hotkey. If you’re confused about why that symbol means CTRL, don’t worry — there will be more on that later in the tutorial.
Next, type this:
Send, Sincerely yours, George Jetson
The command in this line is Send. Anything after the comma will be displayed on screen.
Finally, type:
return
Once you have finished this, save the script. Right-click it once more and click Run script.
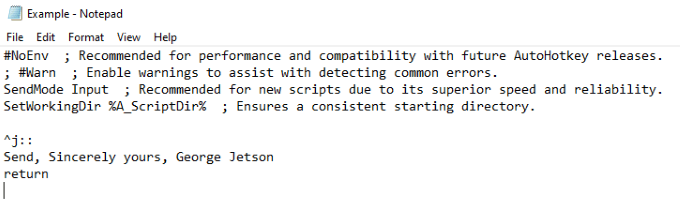
When all is said and done, it should look like this:
^j::
Send, Sincerely yours, George Jetson
return
Now whenever you type CTRL+j, the phrase “Sincerely yours, George Jetson” will appear.
Creating a Hotstring
The above command was a hotkey. Now we will show you how to build a hotstring, or a shortcut that types a word or series of words. This is the same process used to type “Windows Autohotkey” without actually typing it.
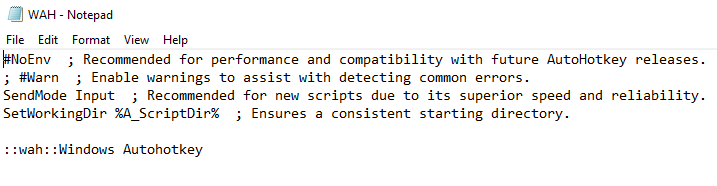
The command is simple. Rather than a double colon (::) to the right of the hotkey, you will surround the abbreviation with two sets of double colons, like this:
::wah::Windows Autohotkey
The text within the colons will serve as the shortcut, while the text to the right of the colons will be what appears when the command is typed.
Hotkey Symbols and Their Meanings
This section will provide a brief explanation of the various symbols and what they mean.
| Symbol | Meaning/Key |
| # | Windows Key |
| ! | Alt |
| ^ | Control |
| + | Shift |
| & | Use between any two keys to create a custom hotkey. |
| < | Use the left key of a set (ex. The left Shift key.) |
| > | Use the right key of a set (ex. The right Shift key.) |
| * | Wildcard (This will activate the hotkey even if other keys are hit.) |
| UP | When you use this in a hotkey, it triggers upon the release of the key. |
These are the most basic symbols. There are several others that are more complicated, but these aren’t necessary to know for learning the basics. You should also know that you can combine multiple symbols together to make them work; for example, <!a means that the left Alt key will trigger the hot key.
Ready-Made Scripts
With any program as powerful and versatile as Windows Autohotkey, people will find ways for it to reach its maximum potential. If you want to look through a series of pre-made scripts that demonstrate exactly what this tool is capable of, look at the Autohotkey Forum.
The forum is broken down into a variety of different sections, but the two main areas to look for pre-made scripts are under Gaming and AutoHotkey V2 Scripts and Functions. You can copy and paste these scripts onto your own machine to take advantage of them.

People have created scripts that do everything from converting a joystick into a mouse to resizing windows with nothing except the right mouse button.
The forums are a great place to not only find pre-made scripts, but to ask for help in crafting your own. Once you’ve mastered the basics, explore the capabilities of Windows Autohotkey to streamline your own user experience.
Windows Autohotkey is a powerful tool that goes far beyond these few basic scripts, but learning these scripts and commands is the key to learning how to put the program to use for yourself on a much greater level.
Aside from using Windows Autohotkey to automatically type longer phrases, it can be used to open files, run programs, and much more. The sky’s the limit — you just have to learn to walk first.
source https://www.online-tech-tips.com/software-reviews/an-autohotkey-tutorial-to-automate-windows-tasks/