
If you use Outlook to communicate with your colleagues, you’ve probably wanted to repeatedly email a specific group whose membership changes often. For example, you may need to email all of your customer service reps every day, but due to high turnover, the list may change often.
You could type each person’s name or email manually every time you send an email, but quickly this can become cumbersome as the group gets larger. Not only that, but you also run the risk of inadvertently forgetting someone which could lead to office drama. That’s where a distribution list or contact group comes in!
For the most part, the terms “contact group” and “distribution list” are interchangeable. Microsoft began using the phrase “contact group,” presumably because it’s a little more intuitive than “distribution list.”

However, there is a real distinction between the two in organizations that are using Microsoft 365. Admins of Microsoft 365 can convert existing Outlook distribution lists to “Groups,” which, in turn, gives group members access to shared libraries and collaboration spaces like Microsoft Teams, Yammer, and Planner.
While your IT department probably rules over your organization’s Outlook distribution lists—especially the dreaded and often poorly-maintained all-staff list, you can still create your own contact groups in Outlook.
Below, we’ll walk you through how to create contact groups in Outlook for both the browser version and the desktop app.
How to Create a Contact Group in Outlook Online
Creating a contact group in the browser version of Outlook is easy.
- Log into your account at outlook.com or select Outlook from the app launcher if you’re already logged into Microsoft 365. If you don’t see Outlook in the app list (you will), select All apps.

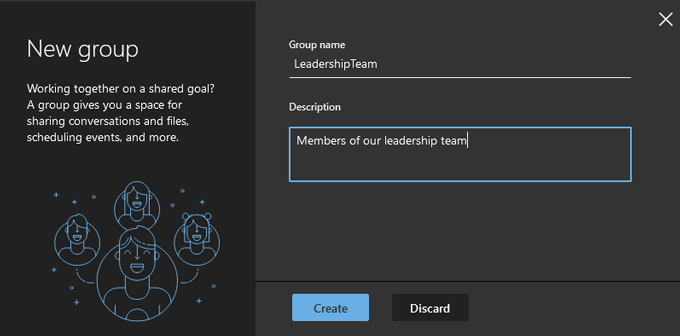
- In the left pane, under Groups, select New group.

- In the popup, give your new group a name and description and select Create. (If your organization has enabled it, you might be prompted to create an email address for the group. In that instance, for ease of use, try to make the email address identical to the group name.)
- Now, add members to the group. Search for people by name or by email address. Select the search result for the person you want to add to the group, and they’ll appear under “This person will be added.”
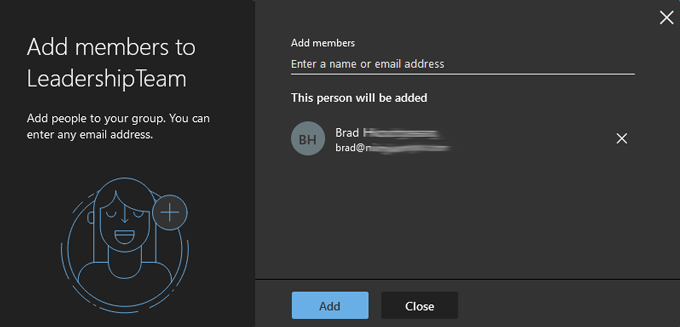
- Repeat step 4 until you’ve added everyone you want to the group. Then select the Add button.
- Select Close.
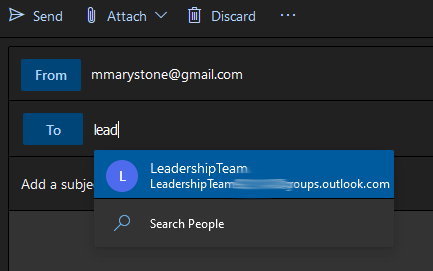
- Send an email to the group you’ve created by selecting New message.

- In the To field, begin typing the name of the group you created, and select it from the list that appears.
Easy peasy. But what if you need to add or remove people from the group? Read on.
How to Edit a Contact Group in Outlook Online
Microsoft has made it easy to edit a contact group without ever leaving Outlook Online. Some steps might be slightly different depending on how your organization has configured Microsoft 365, but the steps below should get you there.
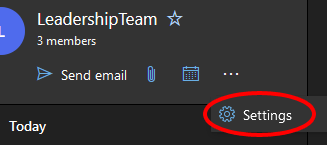
- In the left pane, under Groups, select the group you want to edit.
- In that group’s entry, select the More (three dots/ellipsis) icon.
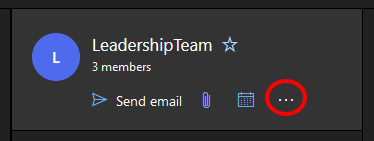
- Select Settings. (Depending on how Outlook is configured for your organization, you might see an option to Add members straight from the More icon.)
- In the Group Settings panel that appears on the right, select Edit group.
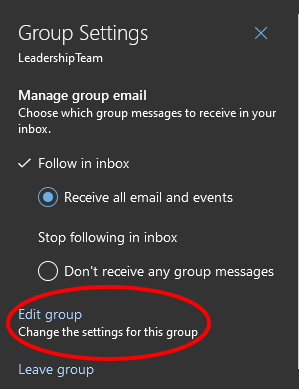
- Select the Members tab.
- From there, you can add members or delete them from the group by selecting the X icon next to the entry for the person you want to remove.
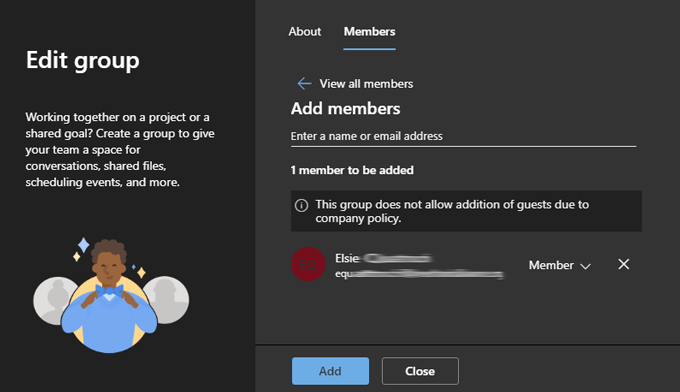
- If you’ve added members to the group, select the Add button. Otherwise, choose Close.
Another Way to Edit Contact Groups in Outlook Online
Depending on how Outlook is configured, you may also be able to edit contact groups by following these steps:
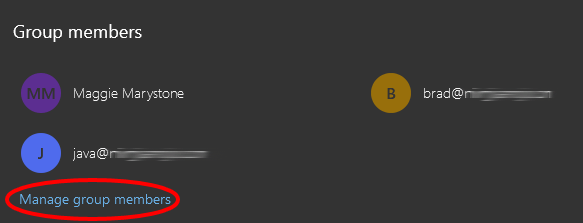
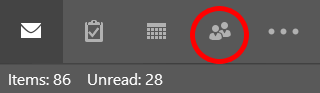
- Go to the People section of Outlook (to the right of the Calendar icon).

- In the left pane in the Groups section, select Owner to display the groups you have created.
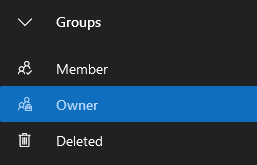
- Select the group you want to edit from the list.
- Select Manage group members.
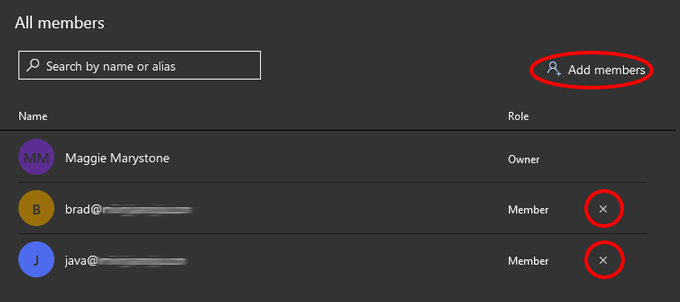
- From there, you can add members or delete existing members by selecting the X next to an entry.
How to Create a Contact Group in Outlook’s Desktop App
Creating a contact group in the desktop version of Outlook is even more straightforward than it is in the online version.
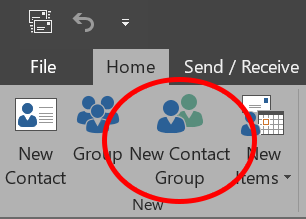
- Launch Outlook, and select the People icon near the lower-left corner (where you switch between email, tasks, people, and calendar).
- Next, from the toolbar, select New Contact Group. (If your organization is using Microsoft 365, you may also see a New Group button. For our purposes, we’ll use New Contact Group to facilitate group emails.)
- In the Contact Group window that appears, give your contact group a name, and then select Add Members and choose where you want to get your new members from. Options might include From Outlook Contacts, From Address Book, or New Email Contact.
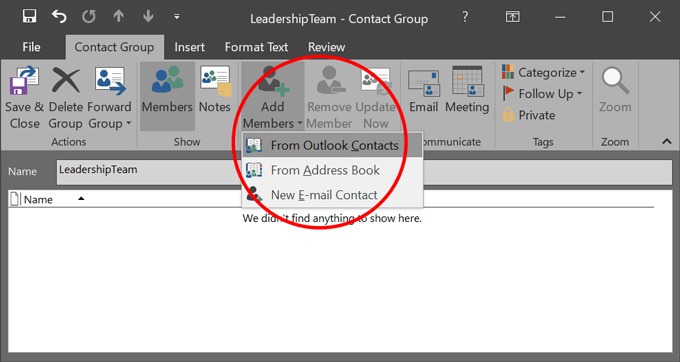
- One by one, search for the people you want to add to the contact group. Make sure their entry is highlighted, and select the Members button (or double-click their entry) to add them. When you’re finished, select OK.
- Close out the window, making sure to respond Yes if prompted to save your changes.
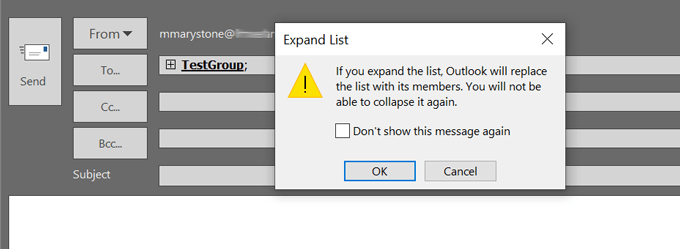
- Now, when you address a new email, you can type the name of the contact group in the To field. Your contact group will be added. If you wish, you can expand the group list, and Outlook will replace the list with its members. Be warned, though, you will not be able to collapse the list again.
Contact groups appear as entries in the Outlook address book, so you’ll be able to find them in that alphabetized list.
How to Edit a Contact Group in Outlook’s Desktop App
Now let’s edit an existing contact group in the desktop version of Outlook.
- Launch Outlook, and select the People icon near the lower-left corner.
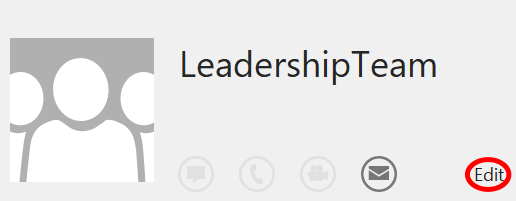
- Find and select the group you want to edit in your contact list.
- In the pane on the right, select Edit. That will bring you back to where you can manage the group by adding and/or removing members.
Whether you’re using the online version of Outlook or the desktop app, it’s definitely worth it to take a few minutes to create Outlook distribution lists you’ll use repeatedly. You’ll be glad you did.
source https://www.online-tech-tips.com/ms-office-tips/how-to-create-a-distribution-list-in-outlook/