Congratulations, you have a Raspberry Pi 4! Now what? To get started, you’ll want to install an operating system on your Pi as well as a GUI if you want a point-and-click interface instead of only interacting with your Pi through a terminal window.
These instructions are for beginners who don’t want to connect a keyboard and a mouse directly to the Raspberry Pi. Instead, we’ll walk you through how to connect a PC on your network to a Raspberry Pi connected to your router via an ethernet cord. You can totally do this!

If you follow these steps, you’ll end up with a Raspberry Pi running a port of Debian with the Raspberry Pi Desktop that you can access via Remote Desktop. These instructions are optimized for the Raspberry Pi 4 but should also work with other versions of the Pi.
How to Install an OS and GUI on Your Raspberry Pi 4
Let’s borrow a concept from cooking called mise en place. That means preparing everything you’ll need before you start, to the extent you can.
Hardware You Will Need
- Raspberry Pi 4.
- SD card. The card should be at least a class 10 and the fastest one you can get your hands on, preferably a V90 UHS-II.
- SD card reader for your computer.
- Ethernet cord to connect the Raspberry Pi to your router.
- A way to supply power to your Raspberry Pi. You could use a power over ethernet Pi HAT if you have a power over ethernet switch that can provide power to the Pi. If you don’t have a switch like that, get an official Raspberry Pi 4 USB-C power supply instead.
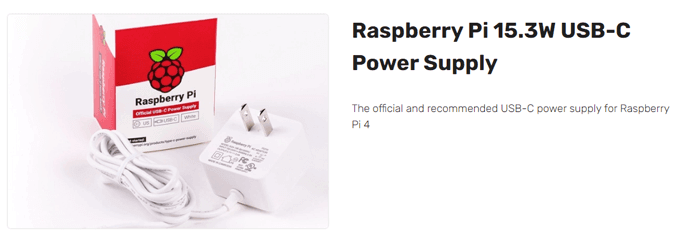
Note: Buying a knock-off power supply or using one you have lying around is a recipe for failure. It’s one of the most common and impossible-to-track-down problems—a power supply that isn’t beefy enough. (If you go the Pi Hat route, you’ll need a case that accommodates the hat.) If you don’t have a case, make sure that you don’t touch any metal while you’re handling the Pi. Better yet, just get a case.
Download These Two Programs to Your PC
- Download Raspberry Pi Imager.
- Download Adafruit-Pi-Finder.
Install and Launch Raspberry Pi Imager
- Open the Raspberry Pi Imager executable, imager_1.5.exe.
- Choose your operating system (Raspberry Pi OS) and the location of your SD card. Then select Write.
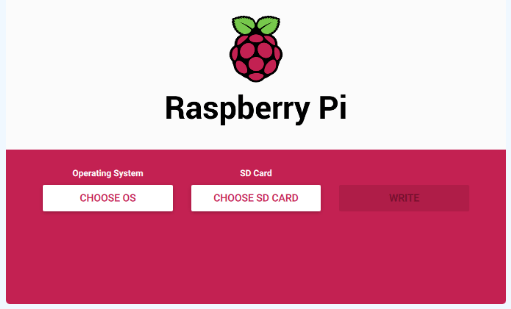
Depending on how your SD card reader is connected to your computer, this could take a while, so be patient while it installs. Maybe find something else to do for a bit.
Create a File Called SSH
- Launch the file explorer on your PC by pressing the Windows Key + E. Set it to show file extensions by selecting View and making sure the box is checked next to File name extensions.

- Right-click and select New > Text Document.
- Rename the file you created to ssh. Delete the extension from the filename.
Transfer the SD Card to Your Raspberry Pi 4
- Eject the SD card from your computer’s card reader.
- Insert the SD card into the Pi.

- Connect the Pi to your router via ethernet cord. (You could also set it up to connect via WiFi, but for now, we’ll use a wired connection.)

Find Your Pi’s IP Address and Install xrdp
- Extract the Adafruit-Pi-Finder zip file that you downloaded in step 2 to your computer. This app will help you find the IP address of the Raspberry Pi on your network.
- Run the Adafruit-Pi-Finder executable, pifinder.exe.
- Select the Find My Pi button. Results may take a while to appear. When they do, copy the IP address from the IP address field, and save it somewhere safe. We’ll use that IP address later to connect to your Pi from your PC.
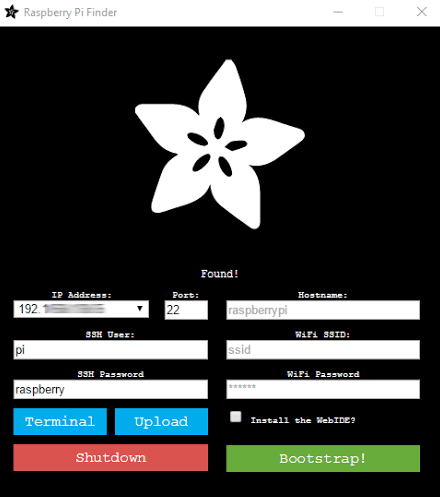
- Next, select Terminal. We’ll change the password later, so for now use the default username pi and the default password raspberry.
- A terminal window will open.
- Now we’ll download and install xrdp software to the Raspberry Pi which will allow you to connect to your Raspberry Pi’s desktop from a Windows machine. In the terminal window, type the following command: sudo apt-get install xrdp and press Enter.
- The installer will probably ask you if you want to continue after telling you how much additional disk space will be used. Type y and press enter.
Connect to the Pi with Remote Desktop and Change the Pi’s Password
- Run Remote Desktop Connection on your Windows computer and paste or type in the IP address of your Raspberry Pi.
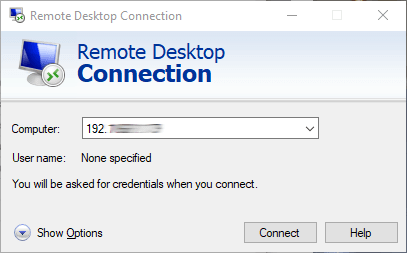
- Select Connect.
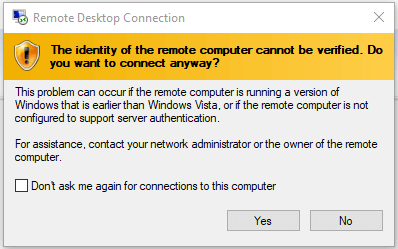
- A warning message will appear. Select Yes.
- A remote desktop window will launch. Type your username, pi, and the default Pi password, raspberry.
- Select OK.
- Tada! You will see a message welcoming you to the Raspberry Pi Desktop!
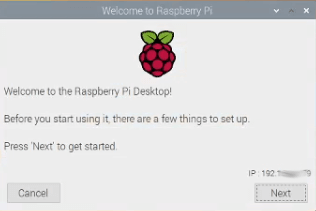
- Select the Next button to proceed.
- Choose your country, language, and timezone.
- Click Next.
- Now it’s time to change the default password for your Pi. Type in your new password twice. (Don’t forget to save it somewhere! Use a password manager! If you lose your Pi’s password, you are in for a world of trouble.)
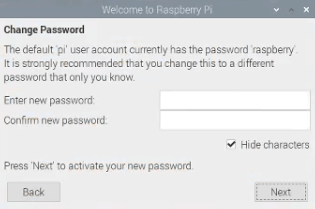
- Click Next.
- Set Up Screen. “Tick the box below if your screen has a black border at the edges.” Press Next.
- Select WiFi Network. You only have to complete this step if you intend on disconnecting your Pi’s ethernet from the router. Select Next or Skip.
- Update Software. Press Next.
- Once the software is updated, you’ll see a “system is up to date” message. Press OK.
- Setup Complete! Select Restart so the new settings will take effect. The next time you use Remote Desktop to connect to your Pi, you’ll be greeted with a beautiful Pi desktop.

Pro tip: Never just unplug your Pi. Always power it down or you could damage your SD card. It will corrupt the memory, and you’ll have to start over. Unplugging it may work a hundred times in a row, and then on the one hundred and first time, it’ll corrupt your memory. Stay safe!
What’s Next?
If you successfully followed the steps above, you now have a Raspberry Pi 4 running an operating system with a graphical user interface that you can connect to and interact with from another computer via Remote Desktop. Now all you have to do is decide how to use it!
source https://www.online-tech-tips.com/gadgets/how-to-get-started-with-a-raspberry-pi-4/
